The Link- Automatic Communication between JMRI and Creators
"The Link" allows one to execute Manifest Creator from within the JMRI Trains build window. This makes the process of using Manifest Creator appear to be "seamless" to the user. There are several things that need to be done both in JMRI and in Manifest Creator to get the link working as designed. These are all explained below.
Manifest Creator consideration:
First a piece of advice: DO NOT jump in with both feet using the Link. First you will want to make sure that your MC is working properly and has the Manifest in the format you would like. This needs to be done by running MC in it's "normal" status, not via the link. You will have little or no control within MC once you begin using the link. However, if you need to change something after you have the link established, you can always run MC in it's "normal" mode and make any changes necessary. These changes would be to the Format and Preferences to adjust the way you would like the Manifest/Switch List to look.
Additional MC considerations:
Once you have established a working MC you will want to set several of the Preferences to enable a "clean" run through MC. These include but are not limited to; Print Preview, Asking if Print is desired, any other features that would halt the MC process waiting for user input. Leaving these in will cause no harm but you need to provide input for all manifests processed. Since we are attempting to "streamline" the process these interruptions seem rather contradictory.
JMRI considerations:
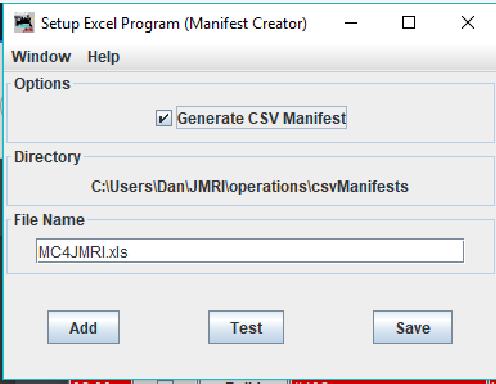
The link will work with one train build at a time or you may run a "batch" of train builds just as you do in JMRI. Control of when MC is executed is controlled by you within JMRI. There are several items that need to be reviewed and set to allow JMRI to interact with MC without user intervention. The first of these is to set the file name for the particular MC that you are using. JMRI expects the MC to be in the csvManifests directory within Operations within JMRI. To set the MC file name you will use Tools>Setup Excel Program (Manifest Creator) - see image below
Manifest Creator consideration:
First a piece of advice: DO NOT jump in with both feet using the Link. First you will want to make sure that your MC is working properly and has the Manifest in the format you would like. This needs to be done by running MC in it's "normal" status, not via the link. You will have little or no control within MC once you begin using the link. However, if you need to change something after you have the link established, you can always run MC in it's "normal" mode and make any changes necessary. These changes would be to the Format and Preferences to adjust the way you would like the Manifest/Switch List to look.
Additional MC considerations:
Once you have established a working MC you will want to set several of the Preferences to enable a "clean" run through MC. These include but are not limited to; Print Preview, Asking if Print is desired, any other features that would halt the MC process waiting for user input. Leaving these in will cause no harm but you need to provide input for all manifests processed. Since we are attempting to "streamline" the process these interruptions seem rather contradictory.
JMRI considerations:
The link will work with one train build at a time or you may run a "batch" of train builds just as you do in JMRI. Control of when MC is executed is controlled by you within JMRI. There are several items that need to be reviewed and set to allow JMRI to interact with MC without user intervention. The first of these is to set the file name for the particular MC that you are using. JMRI expects the MC to be in the csvManifests directory within Operations within JMRI. To set the MC file name you will use Tools>Setup Excel Program (Manifest Creator) - see image below
|
|
Now enter the name of the Manifest Creator that you are using. Once this is entered you may Test to seen if JMRI finds the MC File - (see image above). Or simply Save the entry and JMRI is ready to Link to Manifest Creator.
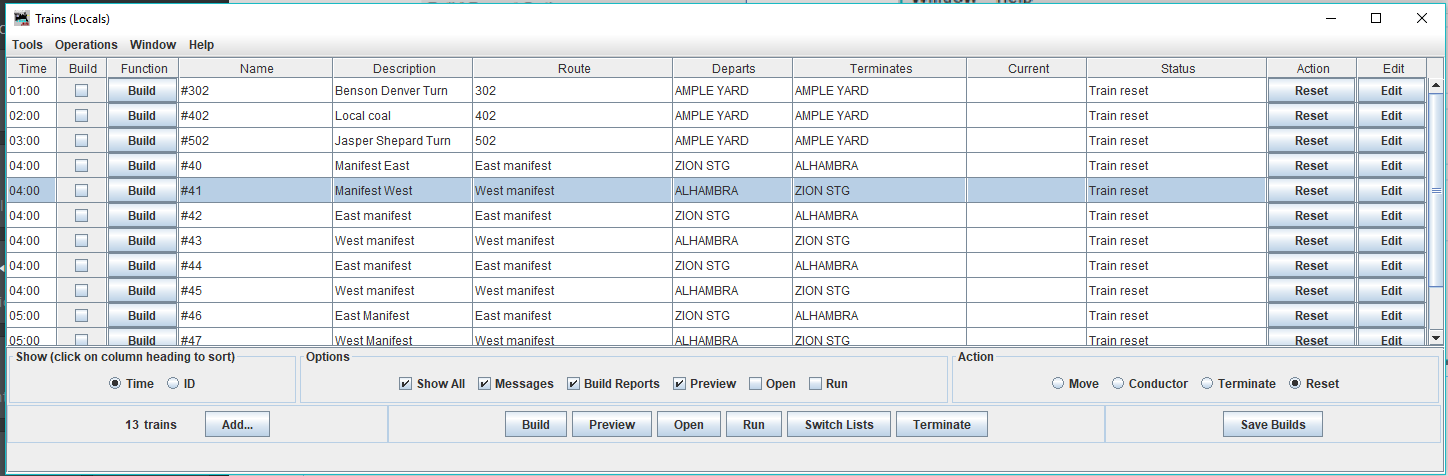
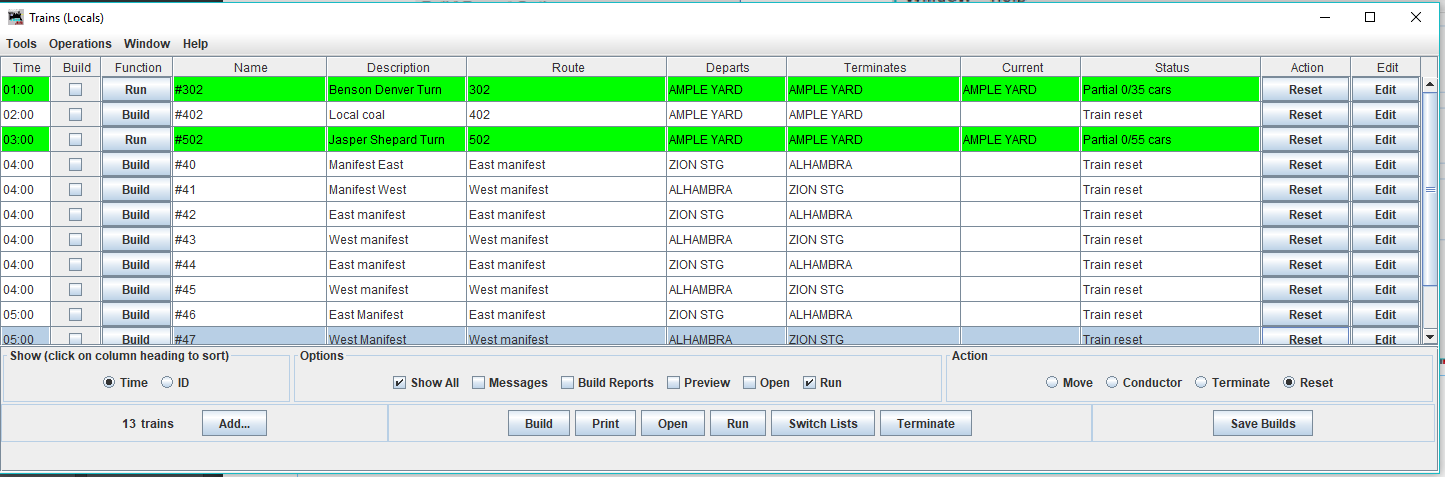
Next you will want to set the Train Build options so that the RUN command is active. Below is an image of a "normal" JMRI Trains Build window. Currently, all/any of the Trains are ready to be built. Once you build a train or trains, you need to select the Run option in the "Options" section. (You can set the Run setting before your trains are built as well.) Once you do this the Function beside any built trains will change to Run - (see second image below-also notice the Check Mark in the box before RUN. ). Here you will see that Train #302 and #502 have been built and set to Run. At this point you can select these trains individually, so that they run one at a time or more appropriately, select the Run button near the bottom of the screen. JMRI will select all trains in a Run status and send appropriate commands to Manifest Creator. When Manifest Creator has finished creating the manifest(s), control will be returned to JMRI. Just as simple as that. You can continue to build and run, build and run, ... build and run. If you use the Timetable feature, running several trains via the link to MC will work very nicely.
Next you will want to set the Train Build options so that the RUN command is active. Below is an image of a "normal" JMRI Trains Build window. Currently, all/any of the Trains are ready to be built. Once you build a train or trains, you need to select the Run option in the "Options" section. (You can set the Run setting before your trains are built as well.) Once you do this the Function beside any built trains will change to Run - (see second image below-also notice the Check Mark in the box before RUN. ). Here you will see that Train #302 and #502 have been built and set to Run. At this point you can select these trains individually, so that they run one at a time or more appropriately, select the Run button near the bottom of the screen. JMRI will select all trains in a Run status and send appropriate commands to Manifest Creator. When Manifest Creator has finished creating the manifest(s), control will be returned to JMRI. Just as simple as that. You can continue to build and run, build and run, ... build and run. If you use the Timetable feature, running several trains via the link to MC will work very nicely.
NOTE: JMRI and MC share a common file named CSVFilesFile.txt. This file contains the names of the CSV files just created during the build process. JMRI adds a file name i this CSVFilesFile each time a train is built. When MC executes, it looks for this file. If found, it will read the contents of the file so as to know what CSV files to process for manifests or switch lists. When MC completes creating all of the manifests/switch lists in the file, it will delete this CSVFilesFile.txt. IF SOMETHING GOES WRONG IN MC, this file is not deleted and whenever MC is started again, it will attempt to process the CSVFilesFile.txt once again. Since it got an error the first time, it will get an error each time MC is run. If you experience issues with MC not running or showing the same error message each time you run it, look for this file in the appropriate csvManifesst or csvSwitchLists folder and delete the file. Then you might need to do some diagnostic work to determine why MC is having trouble with one of the CSV files in the CSVFilesFile.txt. You can do this by running the CSV files one at a time using MC in its "normal" mode. If this does not help determine the error, send a message and help to aid in resolving the issue we be forthcoming.
This completes the explanation of the JMRI to MC Link Process. ENJOY!
This completes the explanation of the JMRI to MC Link Process. ENJOY!
